
So, you want to build a drone? Awesome! The following tutorial is going to guide you through every step of the process. Let me warn you: it’s pretty long (5,000+ words), so you may want to bookmark this page. Why did I make this guide so long? Basically, a lot goes into building a drone, so I want to make sure I leave nothing out. From understanding basic UAV/drone terminology, to assembling the different parts of an RC quadcopter, you’re going to learn all the steps, from A-Z, on how to build a drone. With that being said, sit back, pull out a pen and paper (for taking notes), and let’s get started.
 Point Of No Return – Do You Really Want to Build a Custom RC Drone?

Let me remind you that building a drone is something that takes practice, especially if you’re a beginner. If you’re looking to “get in the air” quickly, then perhaps it’s best to purchase an RTF (Ready-to-Fly) model and save this DIY project for a more convenient time. When I built my first RC drone back in 2014, it took me a few tries to get it right, but when I finally got my drone in the air, it was an amazing feeling. With that said, if you’re still here, I’m assuming you’re still up for the challenge, so let’s go learn how to build a quadcopter!
How to Build a Drone – Part 1: Understanding Basic Drone Terminology
Before you can even think about building your own custom quadcopter, there’s a lot of basic terminology that you need to learn first. It may sound like a hassle, but be rest assured that you’ll be thanking me later on in the guide when a bunch of new lingo starts to show up. For your convenience, I’ve divided up all the terms you need to know by category:
Basic
- Drone: Synonymous with the term “quadcopter” or “UAV”. The term “drone” is generally reserved for unmanned aerial vehicles designed for military use.
- DIY: Stands for “Do-It-Yourself”, which in this case, means building a custom quadcopter by using different parts that may or may not have been originally designed for one another.
- UAV: Stands for “unmanned aerial vehicle” (of any kind).
Mechanics
- Size: Usually provided in millimeters (e.g. 350mm), “size” represents the greatest point-to-point distance between two motors on a drone. Size can also help determine a drone’s “class” (mini, micro, etc.).
- CG: Stands for “Center of Gravity”, which is the point on the drone where weight is equally distributed on all sides (VERY important when learning how to build a drone).
- Dampener: Dampeners are small molded pieces of rubber used to minimize vibration throughout an RC drone.
- Frame: A drone’s frame is synonymous with a human being’s skeleton – it helps bring together important components, as well as provide protection.
- Landing Gear: For an RC drone to land without damaging fragile hardware, it must have landing gear. Unlike airplanes, which have wheels on their landing gear, RC drones utilizes plastic, metal, or rubber materials to help cushion landings.
- LED: To help orientate you to an RC drone’s location at night, it needs to have “Light Emitting Diodes”, or LEDs, on it.
- Prop Guards: Prop guards help protect your drone’s propellers from coming into contact with the external environment. They are also there to protect the operator (you).
- Shell: A drone’s “shell” is its outermost cover. Made from a variety of materials, it’s designed for aesthetic purposes (style) as well as functional purposes (proving protection from the elements). Depending on the shell’s shape, it can help the drone become more aerodynamic.
Sensors
- Accelerometer: This sensor is designed to measure liner acceleration.
- Barometer: This sensor is designed to let the drone know how high above the ground it is. It does this by measuring pressure. Since air pressure changes with altitude, the drone can determine its own height with the help of a barometer.
- Gyroscope: A gyroscope is designed to measure angular acceleration on an x, y, or z axis. Basically, it’s responsible for allowing the drone to fly in a stable manner.
- GPS: Also known as a “Global Positioning System”, a GPS sensor allows satellites to pick up on a drone’s location so that the flyer (you) can do things like set specific coordinates for your drone to fly to, or even bring the drone back to its original staring location despite it not being in your field of sight.
Types
- RTF: Stands for “Ready-to-Fly”. It describes any RC quadcopter that comes with fully assembled with all of the parts and accessories required for flight.
- BNF: Stands for “Bind-and-Fly”. It describes any RC quadcopter that comes fully assembled WITHOUT a transmitter (you’ll need to choose a compatible transmitter to “bind” to the receiver on your drone).
- ATF: Stands for “Almost-Ready-to-Fly”. These drones don’t come fully assembled, and will require additional parts/accessories before they can be flown.
- Hexacoter: A UAV that has six motors/propellers.
- Multirotor: This term can be used to describe any aircraft that has multiple rotors.
- Octocopter: A UAV that has eight motors/propellers.
- Quadcopter: A UAV that has four motors/propellers.
- Tricopter: A UAV that has three motors/propellers.
Propulsion
- ESC: Stands for “Electronic Speed Controller”, which is something that connects to the flight controller, motor, and battery, and helps mediate the speed by which the motors are rotating (you’ll learn a lot about these later on).
- Li-Po: Stands for “Lithium Polymer”, which is pretty much the universal battery type used to power RC drones. The reason why is because they’re lightweight (they won’t weigh the drone down) and are capable of releasing a lot of current.
- Motor: The motor is the part of the drone that rotates the propellers. Larger UAVs typically use “brushless” motors while smaller UAVs typically use “brushed” motors (you’ll learn about the differences between the two later on).
- PCB: Stands for “Printed Circuit Board”. This is a flat fiberglass part that has many different components soldered to it.
- Power Distribution: In order to power the different parts of an RC quadcopter, batter power must be shared, or “split”, to all those different devices. This is done with the help of a power distribution board. It takes the single negative and positive terminal from the drone’s battery and provides numerous other terminals (or connection points) throughout the drone so that other devices can receive power.
- Prop Adaptor: A prop adapter is the thin used to connect the drone’s motor to the propellers.
Video
- FPV: Stands for “First Person View”. This is when you’re able to see a live video feed of what you’re drone’s camera is seeing while it’s recording.
- LCD: Stands for “Liquid Crystal Display”. It’s a type of screen used to display an image that’s coming in from a receiver.
- Gimbal: A gimbal is something that holds a camera during a flight, and allows it to deliver stable footage.
- GoPro: This is a popular sports/action camera that can be attached to RC drones with the proper mounts.
How to Build a Drone - Part 2: Choosing a Frame For Your Drone
On your quest to learn how to build a drone, it's imperative that you memorize the above terms. At the very least, you should have them written down for quick reference. In this part of the guide, you're going to learn about the different types of frames that you can use to build a drone. Below, we're going to cover all of the most basic/common frame configurations that exist, as well as show you the different types of materials that they can be made from. Like before, make sure that you take notes because the following information is very important!
Types of RC Drones/Frame Setups
Not only am I going to show you the most common types of frame setups, but I'll also discuss the pros, cons, and characteristics of each one. With that being said, let's get started.
Frame Type #1: Quadcopter
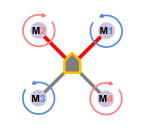 This is by far the most common type of frames that you see within the RC drone industry. It has four arms, each of which are connected to a single motor. In the illustration to the left, you'll notice that the quadcopter is designed in an "x configuration". Just remember that "+ configuration" quadcopter frame setups also exist. When learning how to build a drone for the first time, I highly recommend that you use a quadcopter frame. Not only is it the simplest type of frame design you'll find, but it's also one of the most versatile. This is why popular drone models like the DJI Phantom 3 and the Parrot Bebop are all built using this exact frame configuration.
Frame Type #2: Tripcopter
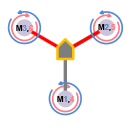 This type of frame isn't as common as quadcopter frames, but it's certainly an option for anyone interesting in learning how to build a drone. This type of RC drone design has three arms, each of which are connected to a single motor. With this type of setup, the UAV will have three arms that are separated by approximately 120 degrees each. Since this design isn't symmetric, the lone rear motor (as you can see from the illustration in the left) must have the ability to rotate using a normal RC servo motor (will be discussed later) so that it can counteract the fact that there are an uneven number of rotors. As with the quadcopter setup, there are benefits and drawbacks to the tricopter setup.
Frame Type #3: Hexacopter
 As its prefix implies, a hexacopter ("hexa" = six) is a type of drone setup in which there are six arms. Each arm is connected to a single motor. Generally speaking, these types of setups are reserved for flyers who are interested in doing some serious aerial photography. They can exist in one of two different "layouts": one in which the front of the body is located between two motors, and one in which the front of the body is located directly behind a single motor. I've never built a hexacopter before, but I thought that I'd include it on this list anyway just so that you can see what your potential options are when learning how to build a drone. Now, let's go over the pros and cons of this frame setup.
Frame Type #4: Octocopter
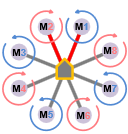 Last but certainly not least on this list is the octocopter. With this frame setup, there are eight arms, each of which are connected to a single motor. As you can imagine, there's a huge amount of thrust being produced with this type of setup. But as the old saying goes, "With great power, comes great responsibility". If you decide to go with this type of frame setup, which I don't recommend if you're a beginner, then you have a long, challenging road of ahead of you. For the most part, these types of RC drone setups are reserved for people who know what they're doing. When learning how to build a drone for the first time, stick to a simpler model, like the quadcopter or tricopter setup.
Common Types of Materials Used For Drone Frames
Now that you've familiarized yourself with the different types of frame setups, let's go over the most common types of materials that can be used when learning how to build a drone frame. While this list does not contain every possible material which can be used in your DIY project, it does include the more popular/budget-friendly ones. With that being said, let's see what they are!
Wood
 If you’re trying to build a drone as cheaply as possible, then consider using a wooden frame. Wood isn’t the most aesthetically appealing option out there, but it’s certainly one of the most inexpensive. One reason why I love wooden frames is because if something breaks, you can quickly and easily replace it. If you’re going to use wood for your drone’s frame, then make sure that it doesn’t have any areas that are warped or twisted.
Carbon Fiber
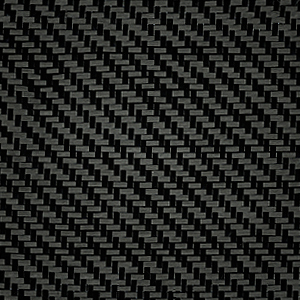 If you can afford it, I would highly recommend building your frame out of carbon fiber. The reason why is simple: carbon fiber is very tough and extremely lightweight. It’s this combination that will make your RC drone fly better and consume less energy. Remember that carbon fiber impedes RF signals (you’ll learn about these later), so make sure that you keep this in mind when you’re mounting important electronic components (like an antenna for example).
PCB
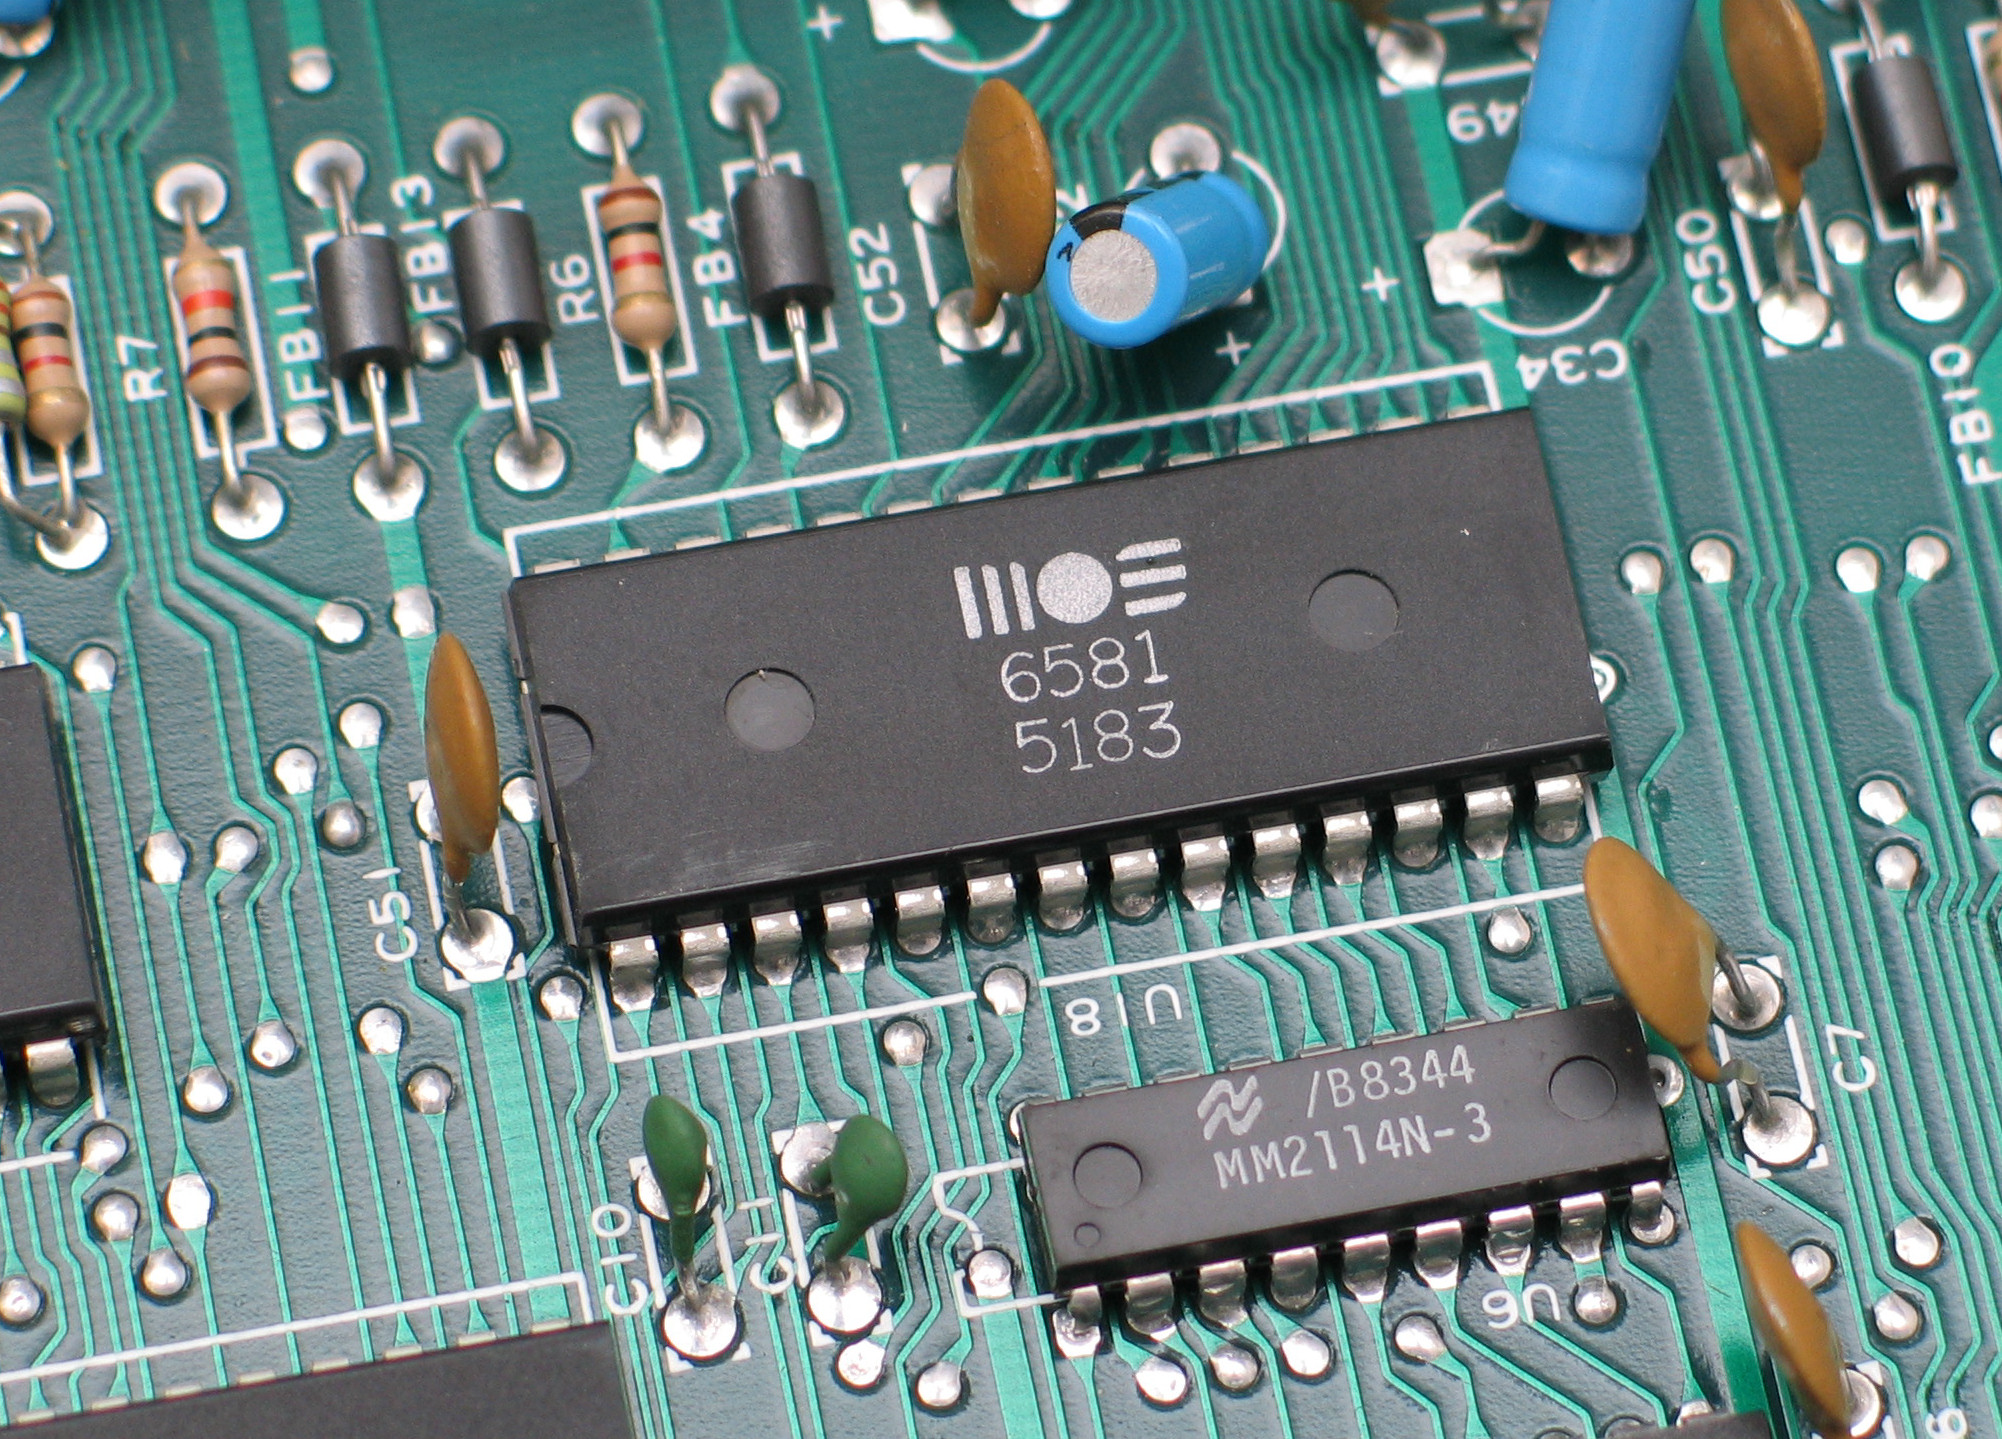 Also known as “Printed Circuit Board”, this is a type of material that shares the same basic structure and properties as fiberglass. Unlike fiberglass, PCD is always flat. Frames that are less than 600mm in size typically use PCB for the bottom and top plates. In fact, small quadcopter frames can be built entirely from a single printed circuit board. Click here to learn more about printed circuit boards and how they work.
Plastic
 Most commercial RC drones that you buy today come with plastic frames. 3D printed molded plastic frames have become an incredibly popular amongst DIY drone enthusiasts. Generally, using a 3D printer to create a perfectly shaped plastic frame is something that only works on smaller drones. When using plastic sheets (not 3D printed shapes or objects), you can strategically use them on your landing gear or for the cover of your drone.
G10
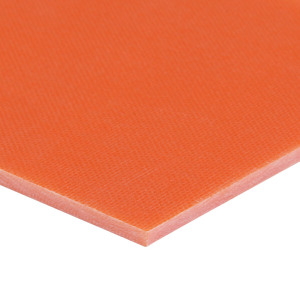 G10 is a variation of fiberglass that’s often used as a less expensive alternative to carbon fiber. From the outside, G10 and carbon fiber look almost identical, but they do vary slightly in their basic properties. You can purchase G10 in sheet format. As far as pricing is concerned, it costs less than carbon fiber but is still more expensive than wood, aluminum, or plastic. Here's a really useful forum post I found on the major differences between G10 and regular fiberglass.
Aluminum
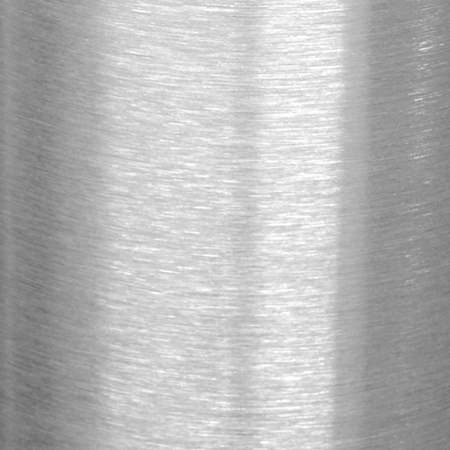 Aluminum can also be used when building your frame. It’s lightweight (though not as lightweight as carbon fiber), flexible, and is relatively easy to work with. You can use aluminum to build the entire frame, or simply use the material to supplement certain parts of the frame (arms, landing gear, etc.). Another benefit to aluminum frames is that this type of material is both inexpensive as well as readily accessible.
How Big Do You Want Your Drone to Be?
When learning how to build a drone, you need to become familiar with the standard sizes that are out there. For example, some RC drones can fit in the palm of your hand – these are called “nano” drones. Larger ones, like “mega” drones, are extremely large, and often must be transported in the backs of trucks. In either case, understanding what size you want your drone to be is very important. As a beginner, I’m going to recommend a size range of 400mm to 500mm. This size range will provide you with A) A lot of value, and B) A lot of versatility.
Are Smaller Drones Less Expensive to Build Than Large Ones?
Not necessarily. As you’ll come to see when learning how to build a drone, the total cost relies more on how advanced your flight controller is, whether or not you’re going to mount a camera, etc. Generally, the frame will be the least expensive part of your build, but this doesn’t mean that it’s the least important.
How to Build a Drone - Part 3: Motors, Propellers, and Propulsion
At this point in your journey of learning how to build a drone, you've mastered basic terminology (I hope) and familiarized yourself with basic frame setups and the materials you could use to build them. In this section, we're going to talk about propulsion. More specifically, we're going to talk about all the stuff that's actually going to get your drone in the air (motors, propellers, batteries, etc.). When learning how to build a drone, this part is exceptionally important, so make sure that you pay attention!
The Motor
Motors are the heart and soul of a drone. It’s what allows you to lift the frame off the ground, hover, and fly in the direction of your choosing. As a general rule of thumb, each motor should deliver the same amount of thrust. Otherwise, you’ll run into problems with stability. In the sections that follow, we’re going to talk about the general anatomy and functions of an RC motor, followed by discuss the different types of motors that you can potentially use when learning how to build a drone.
How RC Motors Work
All electric motors are made up of two components: magnets and “windings” (coils of wire). Don’t worry, you won’t need to refer to a physics textbook to grasp what I’m about to teach you. In a nutshell, the coils of wire (windings) moving within a magnetic field creates an electric current thus, causing the rotor to spin around and round. If any of that sound confusing, check out the video below as it may be able to explain it better:
Brushed vs. Brushless Motors – What’s the Difference?
When I first started learning how to build a drone, one thing that I kept hearing about over and over again were “brushed” and “brushless” motors. At the time, I had no idea what they meant, nor did I know how each motor was different from the other. Because of this, I wanted to create a section dedicated completely to helping you differentiate between the two.
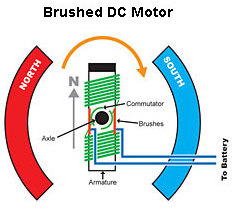 Like all RC motors, brushed motors contain windings (coil) and magnets. With this particular type of RC motor, the magnets remain FIXED while the coils SPIN. Generally speaking, brushed motors are quite popular amongst smaller, inexpensive model quadcopters (like the Syma X5C or Cheerson CX-10).
One potential downside to this type of motor is that the brushes can wear out rather quickly, so their lifespans tend to be less than that of a brushless motor. Obviously, there are exceptions, but this tends to be the general rule. Personally, I've built a few smaller drones using brushed DC motors, and each time, I've almost always experienced problems after relatively short period of time.
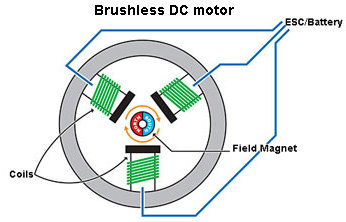 When learning how to build a drone, you need to understand how brushless motors work. Brushless motors act in the exact opposite manner: their COILS remain fixed while their MAGNETS are spun. As its name implies, a brushless motor does not contain any brushes, which can actually lead to the longevity of the RC motor.
When I teach people how to build a drone, I almost exclusively recommend brushless motors due to their durability, versatility, and ability to generate a lot of power. Just know that you will pay more for brushless motors compared to brushed motors. Here are a very common types of brushless DC motors that you’ll encounter:
- Inrunner: These types of brushless motors have coils that are fixed on the outer casing, while the mobile magnets spin on the inside of the casing.
- Outrunner: As you can probably guess, these types of brushless motors have their magnets on the outer casing, and are spun around the fixed coils that are located within the middle of the motor casing.
While nothing about RC motors is black and white, do know this: outrunner brushless DC motors are generally exclusive to helicopters, airplanes, and RC cars (due to their high KV), and tend to have less torque than their outrunner brushless DC motor counterpart.
Understanding KV
The KV Rating of a motor relates to how fast it is able to spin at a specific voltage (more specifically, it equates to 1,000 per volt). For the average RC drone, a low KV is recommend (anywhere between 500 and 1,000). Why? Because it helps stabilize the drone mid-air. If you’re planning on doing more acrobatic flights, a high KV is recommend (anywhere between 1,000 and 1,500). I found a really useful forum post that helps explain KV Rating much more clearly.
As you can see, understanding KV is pretty straightforward. If you're going to learn how to build a drone, it's important that you begin to really think about things like KV and motor types. That way, should you ever decide to build your own custom quadcopter, you could do so without help or guidance from anyone else. But we're not quite there yet! Let's move on to talk about another important part of a drone's propulsion system - the propellers.
Propellers
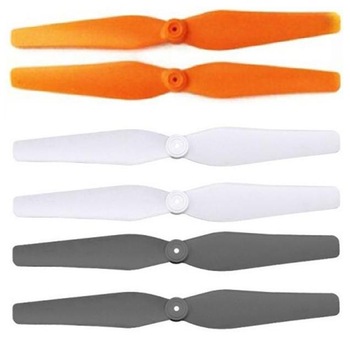 All multi-rotor RC aircrafts use propellers (not to be confused with helicopter blades) to achieve lift. Propellers attach to the drone’s motors. When the motor spins, so do the propellers. Similar to drone frames, propellers can be made from a wide variety of materials, as well as exist in many different sizes.
The majority of RC drones come with three-bladed or two-bladed propellers, with the most common setup being two. Smaller blades (those with smaller diameters) tend to be easier to slow down and speed up, which comes in handy if you’re interested in doing acrobatic flights. Larger blades, or those with larger diameters, are better-suited for more stable flights since it’s harder to speed up or slow down the blades.
Propeller Rotation
All propellers that you use to build a drone come designed to spin in one of two ways:
- Clockwise (CW)
- Counterclockwise (CCW)
Obviously, it’s important that you be able to tell which part of the propeller is supposed to face upwards and which part of the propeller is supposed to face downwards (you’ll learn more about this in later sections).
Materials Used to Make Propellers
Remember when we talk about all of the different materials that a drone’s frame could be constructed from? Well, propellers aren’t any different. Here are some of the more common materials that are used to make propellers:
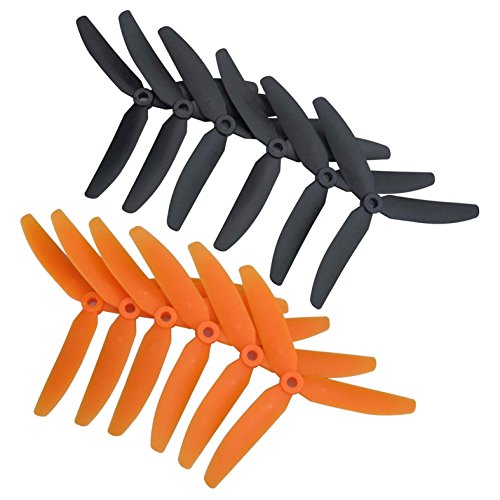 Plastic is by far the most popular choice for propellers in the multi-rotor industry. This is mainly due to their low cost and respectable durability. Unfortunately, plastic propellers do have their downsides. For example, when you crash, it’s very likely that, without a prop guard, you’ll damage your propellers (even with prop guards there’s a chance you can damage them). The good news is that plastic propellers are dispensable, so you can break the again and again without worrying about spending a lot on new ones. When learning how to build a drone, choosing plastic propellers for your propulsion is certainly a good idea.
 Now, I know what you’re probably thinking, “You can use wood to build a drone?” Absolutely! But I’ll be the first to tell you that they are no common in the drone industry. As you can probably already guess, due to the intricate machining required to produce wooden propellers, they will cost much more than plastic. On a good note, wooden propellers tend to be very durable. They won’t bend, and tend to remain in pretty good condition after light crashes. While they’re not common in the RC drone industry, you can still find them in various RC planes.
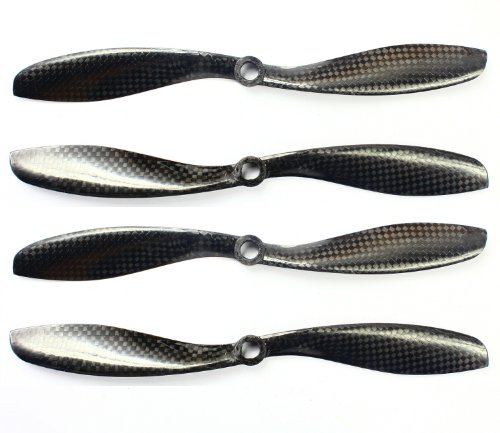 If you’re looking for something that’s super-high quality and that won’t break, then consider using carbon fiber propellers when building a drone. Just note that you will be paying top dollar for these propellers. What I love about carbon fiber propellers (I used them in a build several years back and they were amazing) is that they are very hard to break, and offer much more flex than a standard plastic propeller. If you’re a beginner who’s never built a drone before, I would stick to plastic propellers until you get a few builds under your belt.
Attaching Propellers to the Motors
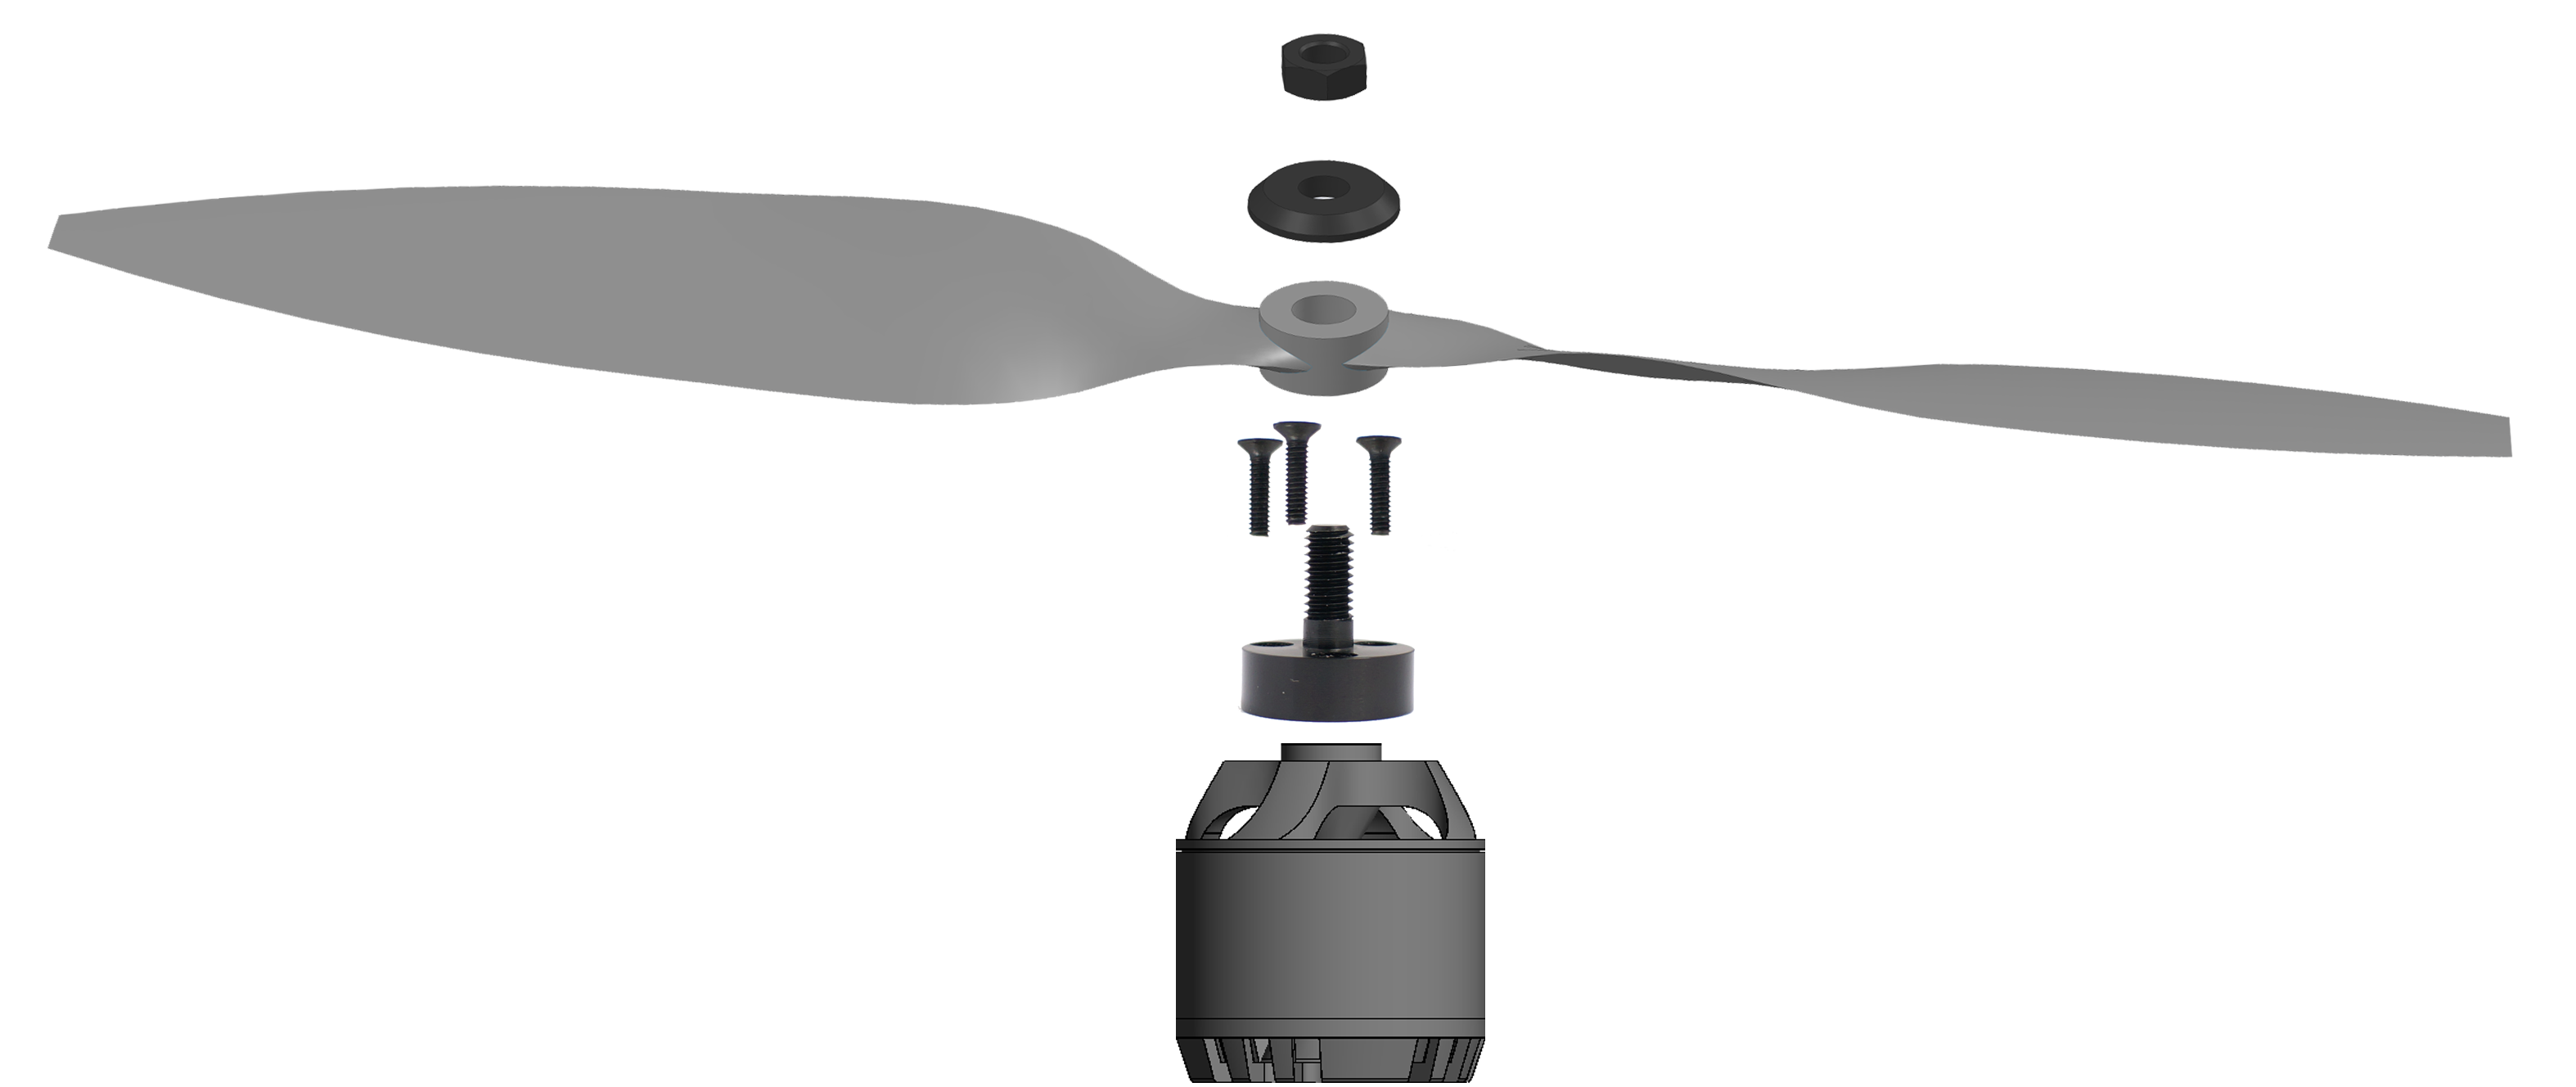
Most, if not, all propellers come with specialized adapter rings that are used to mount the propellers to the drone’s motors. If when mounting your propellers you discover that the “bore” (center) of the propeller is too large for the motor shaft, then you’ll need the adapter ring/spacer to make it fit accordingly.
Don’t ever assume that the propellers you’re purchasing come with adapter rings. Sometimes they won’t, and if you’re unfortunate enough to have a set of propellers that don’t properly fit your motors, then you’ll need to put your DIY project on hold until they arrive in the mail. And who wants that? If you look at the visual schematic below, you’ll be able to see exactly how propellers are attached to the drone’s motors:
Prop Savers
 A “prop saver” is designed to replace a normal propeller adaptor on a motor. Prop savers contain small parts that help keep the propeller in place. In the event that you crash your drone, they will help save your propeller and motor from damage. They do have a few drawbacks though:
- The O-rings can become brittle and crack over time.
- If you place the prop savers on wrong, then it can lead to vibration.
- The propeller will sit higher on the shaft than normal.
Prop Guards
A “prop guard” is the thing that surrounds the propeller and prevents it from coming in contact with anything from the outside environment. When learning how to build a drone, I would definitely keep prop guards in mind. If you’ve never flown before, chances are good that you’re going to crash…a lot. And the best way I can think of to protect your props is to use a prop guard. RC quadcopters like the UDI U818A or FQ777-124 Pocket Drone come with removable plastic prop guards. Just keep in mind that they’re not perfect, and do come with their own set of drawbacks:
- They add weight to your drone, which can decrease overall flight time.
- They only work for “light” crashes.
- They can contribute vibration of your RC aircraft.
The Electronic Speed Controller (ESC)
The electronic speed control (ESC) is the thing that provides the flight controller (we’ll be covering this in the next section) with the ability to control the direction and speed of the drone’s motor. In short, it’s a VERY important component to keep in mind when learning how to build a drone. Not only should an ESC provide the right voltage, but it must also be able to handle the maximum current that the motors are going to consume.
The majority of electronic speed controllers in the RC drone industry only allow the propellers to spin in a single direction. However, with the right firmware, you can configure them to fly in two directions. Below is a quick video that should help you become familiarized with the different components of an electronic speed controller.
Connectors
When learning how to build a drone, and upon taking a look an electronic speed controller, you might notice several different wires existing on two side. Let’s take a look at what those are now:
- 3-Pin R/C Servo Connector: This is the thing that accepts the RC signal.
- 3 Bullet Connectors: These are the things that connect to the three pins that you’ll find on a brushless motor.
- Power Input: The pair of thick wires (normally, one will be red and the other will be black) are there to obtain power from the power distribution board.
BEC
Also known as a “Battery Elimination Circuit”, a BEC is designed to convert battery DC voltage to the required DC voltage of the flight controller you're using.
Firmware
One of the main benefits of having an electronic speed controller that’s equipped with firmware is that it will be able to react much more quickly to changes in input. What exactly does this mean? Essentially, it allows the flyer (you) to experience a much more acrobatic flight with more responsive controls.
Power Distribution Board
As you’ll come to see in the assembly lesson later, the ESC is powered by the RC drone’s main battery. However, when building a drone, the battery’s single connector must be able to be split among four different electronic speed controllers. In order to achieve this, you’ll need something known as a “Power Distribution Board”. This component helps split the battery’s negative and positive terminals into four. Pretty simple, wouldn’t you agree?
Battery
Nearly all RC drones are powered by Lithium Polymer (Li-Po) batteries. Other variations of these batteries do exist, but they’re rare. In this guide, you’re going to learn how to build a drone using exclusively Li-Po batteries. Once reason why these batteries are excellent power sources is because they’re A) Lightweight, and B) They give off a lot of power. Perhaps their only downside is that they can cost higher than normal batteries, and if not handled properly, they can become a safety issue. Check out the below video as it should help explain these types of batteries a little more in-depth:
A battery’s voltage is something you must take into consideration when constructing your RC drone. Basically, the battery’s voltage should match with the motors you’ve chosen. Otherwise, you’re going to run into problems. When learning how to build a drone, keeping tabs of a battery's voltage is extremely important.
Battery Capacity and Discharge Rate
The capacity of a battery pack is measured in amp-hours, or Ah. Smaller battery packs have capacities of approximately 0.1Ah (or 100mAh), while larger battery packs can have capacities of 2-3Ah (2,000mAh-3,000mAh). As a general rule of thumb, the higher the capacity, the more flight time you’re going to experience (just keep in mind that the larger battery also means a heavier RC drone). When you learn how to build a drone, you’ll almost always get a flight time of about 10 minutes, with five minutes being the average low and 20 minutes being about the max.
A battery’s discharge rate is measured in the unit “C”. The average discharge rate of most Li-Po batteries is about 5C (five times the capacity). Next in this guide on how to build a drone, you're going to learn about the "brains" behind the operation - the flight controller.
How to Build a Drone - Part 4: The Flight Controller
By this point in your journey on learning how to build a drone, you’ve:
- Learned basic terminology
- Built your frame
- Purchased all the appropriate batteries, motors, propellers, and electronic speed controllers.
But guess what? None of this can work without a flight controller. In simplest terms, the flight controller is the “brains” of the operation. It’s the thing that contains all of the microprocessors, sensors, and output/input pins that make it possible to maneuver your RC drone through the air.
Sensors
Flight controllers can have many different sensors built into them. These sensors are designed to gather information about the drone’s speed, direction, height, and much more. At an absolute minimum, a flight controller will have a three-axis gyroscope (gyroscopes help keep drones stable mid-air). Let’s take a look at a few different types of sensors that may or may not be present in the flight controller that you’ve chosen:
- Accelerometer: Measures liner acceleration on up to three axes (X, Y, and Z). It plays a major role in allowing an RC drone to remain stable in the air.
- Gryoscope: Detects angular changes on up to three angular axes (alpha, beta, and gamma).
- Inertia Measurement Unit (IMU): Small board that contains the gyroscope and accelerometer.
- Compass: As you can probably guess, this reads/gives off information regarding the drone’s direction.
- Barometer: This measures atmospheric pressure and tells the drone how high it is. Remember, as you go higher up into the air, pressure increases. It’s in this way that a barometer is able to detect changes in height.
- GPS: Helps determine the specific geographic coordinates of the drone.
As you can probably imagine, the more sensors you have, the more expensive the flight controller is going to be when learning how to build a drone. A model like the DJI Phantom 3 will have more sensors that the Syma X12. To get an idea about all of the components of an RC drone work together with the flight controller, check out the following video:
How to Build a Drone - Part 5: Putting it All Together
Now that you've come to understand all of the underlying theory on how to build a drone, it's time to put it all together. Take a look at the following two videos and learn about how these parts work together, as well as how you can go about constructing your RC drone: